G80 Safety Hook,G80 Lifting Hook,G80 Self Lock Hook Shandong Shenli Rigging Co.,LTD. , https://www.shenliriggingcn.com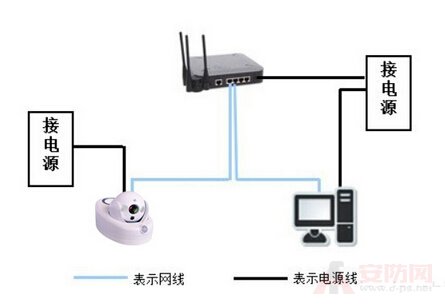
[ Huaqiang Security Network News ]
Do you know how to connect the network camera to the router? The following is a detailed introduction of the China Security Network.
How to connect a network camera to a router
1. First of all: you have to make sure the network can go online
2. First realize the intranet ip LAN viewing is generally first know the network camera's intranet ip 192.168.1.* * does not necessarily mean
3. Then install the plugin on the computer where you want to see the image.
There are two types of plugins.
One is that the network universal plug-in is automatically 4.5 seconds, while the general computer default is not allowed to download unknown plug-ins.
So in the casually open IE tool - internet option - security - internet and local internet - custom level - all enabled with the Activex plugin
In this way, enter the intranet ip on IE for 2.3 seconds. The plugin enters the default account password. The pop-up channel double-clicks the channel to view it.
The second is to use the network camera to bring the CD-ROM to install the remote client, add the internal network ip default account password can be seen
3. After the internal network is viewed, the basic steps are clear, and the external network is simple.
First, insert the Internet cable in the network camera and select the automatic ip in the network function.
It’s important to see how much the image port is the default.
To set up port mapping on the router
Then restart
After rebooting, enter the network function and you will see that the network camera has automatically acquired an ip.
This ip is the external network ip and each time the network camera is powered off, the external network ip is changed.
Let's talk about the router port mapping. Why do you want to do this?
How does an information router that accesses multiple computers on a router to access an external network knows which computer the external network needs to access? Here, port mapping is required.
Log in to the router and see the port of the network camera just now.
About the router settings The following description is made under the road configuration interface. The domain name is used. There may be differences between the configuration interfaces of other routers.
1. First select the Internet access method for the router "Setup Wizard" of the network where the DVR/DVS is located.
2. Set the "network parameters" of the router. The following figure shows the parameter settings of the LAN port. It contains the mask and gateway of the LAN. Here the IP address 192.168.1.1 is the gateway of the intranet.
3. Make the port mapping in the virtual server option in the forwarding rule of the router. As shown in the following figure, the port number of DVR1 is 80 and 8000, and the IP address is 192.168.1.2. The port number of DVR2 is 81 and 8001, and the IP address is 192.168. .1.3. Then select ALL or TCP at the protocol and select Enable. The port mapping function is implemented after saving the corresponding settings.
By setting as above, we have mapped the ports 80 and 8000 of the router to DVR/DVS 192.168.1.2, and ports 81 and 8001 are mapped to DVR/DVS 192.168.1.3. This accesses the 80 or 8000 port number of the router to access DVR/DVS 192.168. .1.2, access to the router's 81 or 8001 port number is to access DVR / DVS 192.168.1.3.
Note: The port number of DVR/DVS cannot conflict with other port numbers. For example, the web management port number of the router. Some are 80. This can be solved by modifying the router or the port number of our DVR/DVS.
4. If the DVR/DVS network access method is PPPOE, you must first apply for a domain name, and then fill in the domain name related information of the application in the "Dynamic DNS" setting of the router. Enable DDNS. If the user name is dahua, the connection is successful. It will display relevant information. It must be activated before using the domain name. It can be activated in the tool of the peanut shell client----Domain Management, and sometimes it can be activated by the "Domain Activation" option of the router. Then the dynamics in the router Fill in the corresponding username and password in the DNS and enable it.